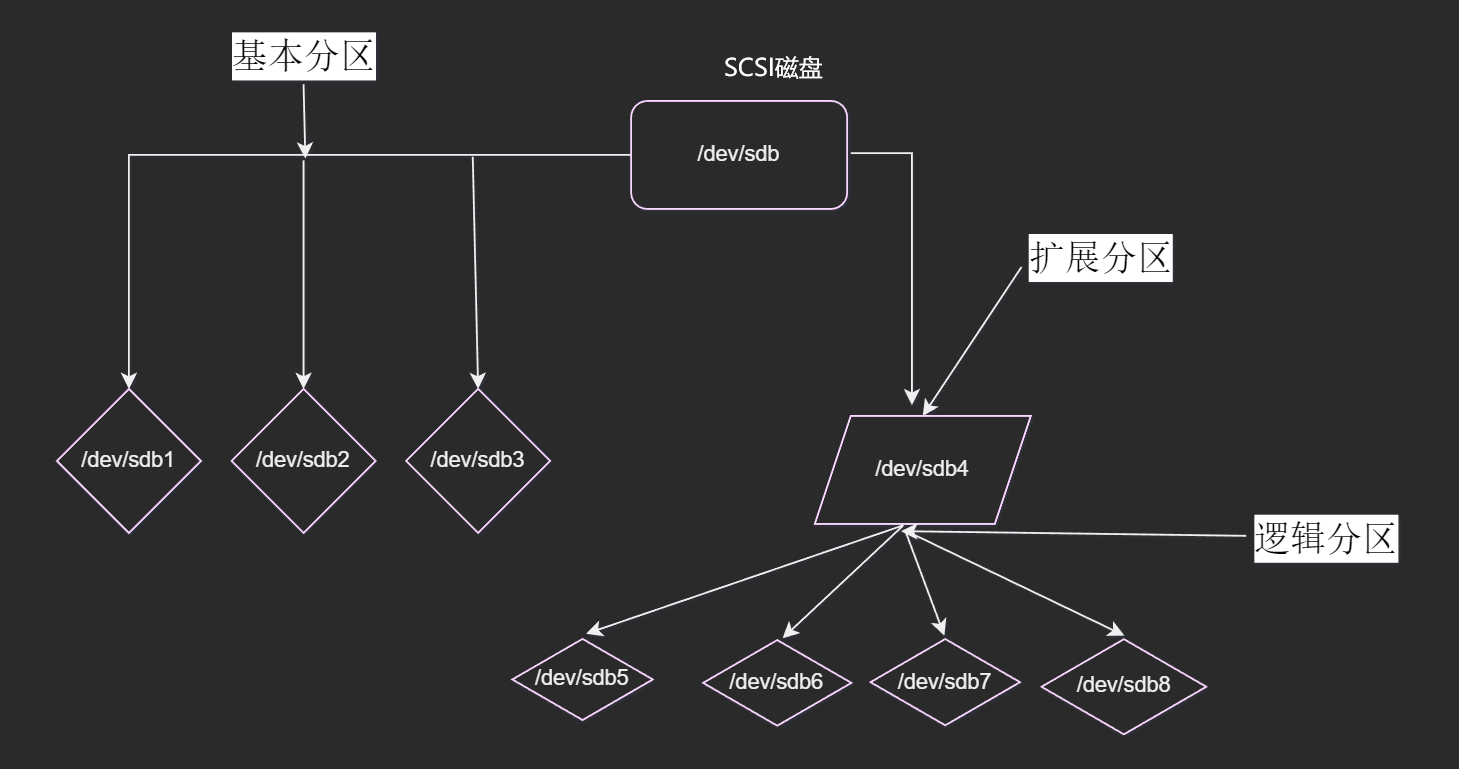
[root@linlink ~]# fdisk /dev/sdb               //指定/dev/sdb分区
Welcome to fdisk (util-linux 2.23.2).
Changes will remain in memory only, until you decide to write them.
Be careful before using the write command.
Command (m for help): n                       //n回车、创建一个新分区
Partition type:
   p   primary (0 primary, 0 extended, 4 free)
   e   extended
Select (default p): p //选择分区类型为(p)基本分区、e是扩展分区、l是逻辑分区(逻辑分区建立在扩展分区上)
Partition number (1-4, default 1): 1           //选择号默认1
First sector (2048-41943039, default 2048):    //选择起始扇区、有需要自己研究去
Using default value 2048
Last sector, +sectors or +size{K,M,G} (2048-41943039, default 41943039): +5G //给分区分配大小
Partition 1 of type Linux and of size 5 GiB is set
Command (m for help): p                         //这里的p是打印分区表(/dev/sdb)
Disk /dev/sdb: 21.5 GB, 21474836480 bytes, 41943040 sectors
Units = sectors of 1 * 512 = 512 bytes
Sector size (logical/physical): 512 bytes / 512 bytes
I/O size (minimum/optimal): 512 bytes / 512 bytes
Disk label type: dos
Disk identifier: 0xc8546a0b

   Device Boot      Start         End      Blocks   Id  System
/dev/sdb1            2048    10487807     5242880   83  Linux

Command (m for help): w                        //w是保存退出
The partition table has been altered!

Calling ioctl() to re-read partition table.
Syncing disks.
[root@linlink ~]# lsblk
NAME            MAJ:MIN RM   SIZE RO TYPE MOUNTPOINT
sda               8:0    0   200G  0 disk
├─sda1            8:1    0     1G  0 part /boot
└─sda2            8:2    0   199G  0 part
  ├─centos-root 253:0    0    50G  0 lvm  /
  ├─centos-swap 253:1    0   3.9G  0 lvm  [SWAP]
  └─centos-home 253:2    0 145.1G  0 lvm  /home
sdb               8:16   0    20G  0 disk
└─sdb1            8:17   0     5G  0 part
sr0              11:0    1   4.2G  0 rom
[root@linlink ~]# fdisk /dev/sdb
Welcome to fdisk (util-linux 2.23.2).

Changes will remain in memory only, until you decide to write them.
Be careful before using the write command.


Command (m for help): p

Disk /dev/sdb: 21.5 GB, 21474836480 bytes, 41943040 sectors
Units = sectors of 1 * 512 = 512 bytes
Sector size (logical/physical): 512 bytes / 512 bytes
I/O size (minimum/optimal): 512 bytes / 512 bytes
Disk label type: dos
Disk identifier: 0xc8546a0b

   Device Boot      Start         End      Blocks   Id  System
/dev/sdb1            2048    10487807     5242880   83  Linux

Command (m for help): n
Partition type:
   p   primary (1 primary, 0 extended, 3 free)
   e   extended
Select (default p): e
Partition number (2-4, default 2): 2
First sector (10487808-41943039, default 10487808):
Using default value 10487808
Last sector, +sectors or +size{K,M,G} (10487808-41943039, default 41943039): +5G
Partition 2 of type Extended and of size 5 GiB is set

Command (m for help): p

Disk /dev/sdb: 21.5 GB, 21474836480 bytes, 41943040 sectors
Units = sectors of 1 * 512 = 512 bytes
Sector size (logical/physical): 512 bytes / 512 bytes
I/O size (minimum/optimal): 512 bytes / 512 bytes
Disk label type: dos
Disk identifier: 0xc8546a0b
   Device Boot      Start         End      Blocks   Id  System
/dev/sdb1            2048    10487807     5242880   83  Linux
/dev/sdb2        10487808    20973567     5242880    5  Extended
Command (m for help): w
The partition table has been altered!
Calling ioctl() to re-read partition table.
Syncing disks.
[root@linlink ~]# lsblk
NAME            MAJ:MIN RM   SIZE RO TYPE MOUNTPOINT
sda               8:0    0   200G  0 disk
├─sda1            8:1    0     1G  0 part /boot
└─sda2            8:2    0   199G  0 part
  ├─centos-root 253:0    0    50G  0 lvm  /
  ├─centos-swap 253:1    0   3.9G  0 lvm  [SWAP]
  └─centos-home 253:2    0 145.1G  0 lvm  /home
sdb               8:16   0    20G  0 disk
├─sdb1            8:17   0     5G  0 part
└─sdb2            8:18   0     1K  0 part
sr0              11:0    1   4.2G  0 rom
[root@linlink ~]# fdisk /dev/sdb
Welcome to fdisk (util-linux 2.23.2).

Changes will remain in memory only, until you decide to write them.
Be careful before using the write command.


Command (m for help): p

Disk /dev/sdb: 21.5 GB, 21474836480 bytes, 41943040 sectors
Units = sectors of 1 * 512 = 512 bytes
Sector size (logical/physical): 512 bytes / 512 bytes
I/O size (minimum/optimal): 512 bytes / 512 bytes
Disk label type: dos
Disk identifier: 0xc8546a0b

   Device Boot      Start         End      Blocks   Id  System
/dev/sdb1            2048    10487807     5242880   83  Linux
/dev/sdb2        10487808    20973567     5242880    5  Extended

Command (m for help): n
Partition type:
   p   primary (1 primary, 1 extended, 2 free)
   l   logical (numbered from 5)
Select (default p): l
Adding logical partition 5
First sector (10489856-20973567, default 10489856):
Using default value 10489856
Last sector, +sectors or +size{K,M,G} (10489856-20973567, default 20973567): +3G
Partition 5 of type Linux and of size 3 GiB is set

Command (m for help): p

Disk /dev/sdb: 21.5 GB, 21474836480 bytes, 41943040 sectors
Units = sectors of 1 * 512 = 512 bytes
Sector size (logical/physical): 512 bytes / 512 bytes
I/O size (minimum/optimal): 512 bytes / 512 bytes
Disk label type: dos
Disk identifier: 0xc8546a0b

   Device Boot      Start         End      Blocks   Id  System
/dev/sdb1            2048    10487807     5242880   83  Linux
/dev/sdb2        10487808    20973567     5242880    5  Extended
/dev/sdb5        10489856    16781311     3145728   83  Linux

Command (m for help): w
The partition table has been altered!

Calling ioctl() to re-read partition table.
Syncing disks.
[root@linlink ~]# lsblk
NAME            MAJ:MIN RM   SIZE RO TYPE MOUNTPOINT
sda               8:0    0   200G  0 disk
├─sda1            8:1    0     1G  0 part /boot
└─sda2            8:2    0   199G  0 part
  ├─centos-root 253:0    0    50G  0 lvm  /
  ├─centos-swap 253:1    0   3.9G  0 lvm  [SWAP]
  └─centos-home 253:2    0 145.1G  0 lvm  /home
sdb               8:16   0    20G  0 disk
├─sdb1            8:17   0     5G  0 part
├─sdb2            8:18   0     1K  0 part
└─sdb5            8:21   0     3G  0 part
sr0              11:0    1   4.2G  0 rom
[root@linlink ~]# fdisk /dev/sdb
Welcome to fdisk (util-linux 2.23.2).

Changes will remain in memory only, until you decide to write them.
Be careful before using the write command.


Command (m for help): n
Partition type:
   p   primary (0 primary, 0 extended, 4 free)
   e   extended
Select (default p): p
Partition number (1-4, default 1): 1
First sector (2048-41943039, default 2048):
Using default value 2048
Last sector, +sectors or +size{K,M,G} (2048-41943039, default 41943039): +5G
Partition 1 of type Linux and of size 5 GiB is set

Command (m for help): p

Disk /dev/sdb: 21.5 GB, 21474836480 bytes, 41943040 sectors
Units = sectors of 1 * 512 = 512 bytes
Sector size (logical/physical): 512 bytes / 512 bytes
I/O size (minimum/optimal): 512 bytes / 512 bytes
Disk label type: dos
Disk identifier: 0xc8546a0b

   Device Boot      Start         End      Blocks   Id  System
/dev/sdb1            2048    10487807     5242880   83  Linux

Command (m for help): t
Selected partition 1
Hex code (type L to list all codes): 8e
Changed type of partition 'Linux' to 'Linux LVM'

Command (m for help): p

Disk /dev/sdb: 21.5 GB, 21474836480 bytes, 41943040 sectors
Units = sectors of 1 * 512 = 512 bytes
Sector size (logical/physical): 512 bytes / 512 bytes
I/O size (minimum/optimal): 512 bytes / 512 bytes
Disk label type: dos
Disk identifier: 0xc8546a0b

   Device Boot      Start         End      Blocks   Id  System
/dev/sdb1            2048    10487807     5242880   8e  Linux LVM
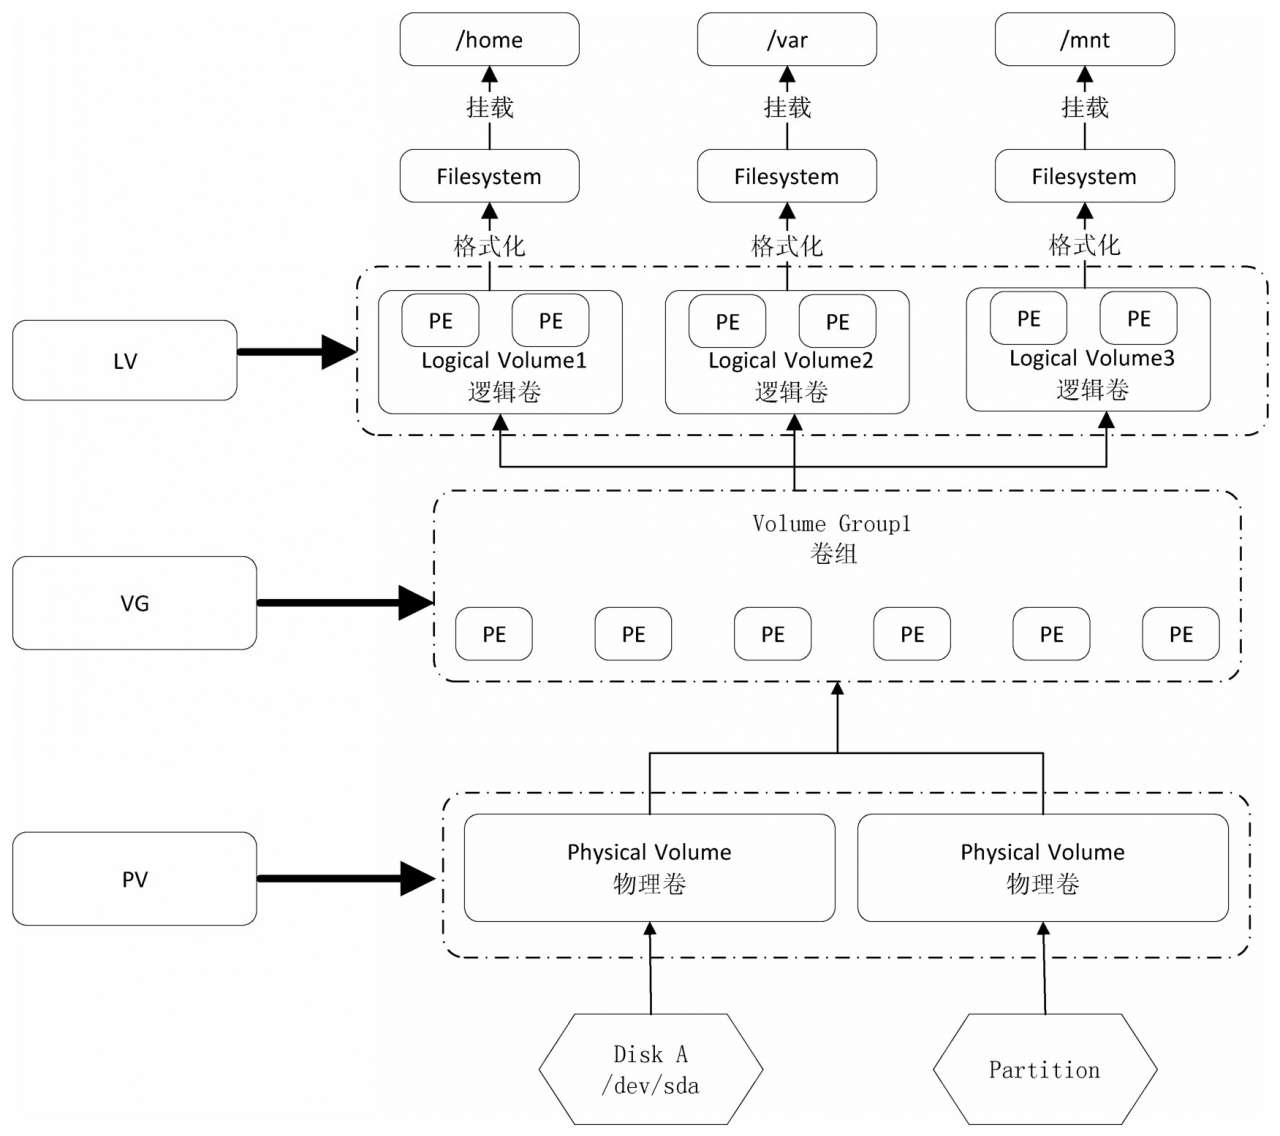
[root@linlink ~]# vgs VG #PV #LV #SN Attr VSize VFree centos 1 3 0 wz--n- <199.00g 4.00m vg1 2 1 0 wz--n- 9.99g 4.99g [root@linlink ~]# vgscan Reading volume groups from cache. Found volume group "centos" using metadata type lvm2 Found volume group "vg1" using metadata type lvm2 [root@linlink ~]# vgdisplay --- Volume group --- VG Name centos System ID Format lvm2 Metadata Areas 1 Metadata Sequence No 4 VG Access read/write VG Status resizable MAX LV 0 Cur LV 3 Open LV 3 Max PV 0 Cur PV 1 Act PV 1 VG Size <199.00 GiB PE Size 4.00 MiB Total PE 50943 Alloc PE / Size 50942 / 198.99 GiB Free PE / Size 1 / 4.00 MiB VG UUID GBOQoR-njkr-HiQ6-Xm8k-iQPu-AFHP-Jb3WHi
--- Volume group --- VG Name vg1 System ID Format lvm2 Metadata Areas 2 Metadata Sequence No 14 VG Access read/write VG Status resizable MAX LV 0 Cur LV 1 Open LV 0 Max PV 0 Cur PV 2 Act PV 2 VG Size 9.99 GiB PE Size 4.00 MiB Total PE 2558 Alloc PE / Size 1280 / 5.00 GiB Free PE / Size 1278 / 4.99 GiB VG UUID 1l0gl7-9OU3-IbqW-53i5-Sk8t-1fZy-XHi53N
[root@linlink ~]# lvs LV VG Attr LSize Pool Origin Data% Meta% Move Log Cpy%Sync Convert home centos -wi-ao---- <145.12g root centos -wi-ao---- 50.00g swap centos -wi-ao---- <3.88g lv1 vg1 -wi-a----- 5.00g [root@linlink ~]# lvscan ACTIVE '/dev/centos/swap' [<3.88 GiB] inherit ACTIVE '/dev/centos/home' [<145.12 GiB] inherit ACTIVE '/dev/centos/root' [50.00 GiB] inherit ACTIVE '/dev/vg1/lv1' [5.00 GiB] inherit [root@linlink ~]# lvdisplay --- Logical volume --- LV Path /dev/centos/swap LV Name swap VG Name centos LV UUID xQq83K-RJRR-gglN-vHqn-M4zu-fxSw-GYEJcB LV Write Access read/write LV Creation host, time 192.168.20.135, 2023-02-04 04:07:36 -0500 LV Status available # open 2 LV Size <3.88 GiB Current LE 992 Segments 1 Allocation inherit Read ahead sectors auto - currently set to 8192 Block device 253:1
--- Logical volume --- LV Path /dev/centos/home LV Name home VG Name centos LV UUID j9354I-22je-aOPM-2Gec-iNuL-3Z50-Ly4yCW LV Write Access read/write LV Creation host, time 192.168.20.135, 2023-02-04 04:07:36 -0500 LV Status available # open 1 LV Size <145.12 GiB Current LE 37150 Segments 1 Allocation inherit Read ahead sectors auto - currently set to 8192 Block device 253:2
--- Logical volume --- LV Path /dev/centos/root LV Name root VG Name centos LV UUID JpAk6n-c373-CKzq-x3v2-PgWI-sxme-ME5AOS LV Write Access read/write LV Creation host, time 192.168.20.135, 2023-02-04 04:07:36 -0500 LV Status available # open 1 LV Size 50.00 GiB Current LE 12800 Segments 1 Allocation inherit Read ahead sectors auto - currently set to 8192 Block device 253:0
--- Logical volume --- LV Path /dev/vg1/lv1 LV Name lv1 VG Name vg1 LV UUID hwQopV-G3KX-o6VZ-K4f3-QXlz-CEm7-BBdQdz LV Write Access read/write LV Creation host, time linlink, 2023-03-10 09:51:20 -0500 LV Status available # open 0 LV Size 5.00 GiB Current LE 1280 Segments 2 Allocation inherit Read ahead sectors auto - currently set to 8192 Block device 253:3
[root@linlink ~]# fdisk /dev/sdb Welcome to fdisk (util-linux 2.23.2).
Changes will remain in memory only, until you decide to write them. Be careful before using the write command.
Device does not contain a recognized partition table Building a new DOS disklabel with disk identifier 0x5166a770.
Command (m for help): n Partition type: p primary (0 primary, 0 extended, 4 free) e extended Select (default p): p Partition number (1-4, default 1): 1 First sector (2048-83886079, default 2048): Using default value 2048 Last sector, +sectors or +size{K,M,G} (2048-83886079, default 83886079): Using default value 83886079 Partition 1 of type Linux and of size 40 GiB is set
Command (m for help): t Selected partition 1 Hex code (type L to list all codes): 8e Changed type of partition 'Linux' to 'Linux LVM'
Command (m for help): p
Disk /dev/sdb: 42.9 GB, 42949672960 bytes, 83886080 sectors Units = sectors of 1 * 512 = 512 bytes Sector size (logical/physical): 512 bytes / 512 bytes I/O size (minimum/optimal): 512 bytes / 512 bytes Disk label type: dos Disk identifier: 0x5166a770
Device Boot Start End Blocks Id System /dev/sdb1 2048 83886079 41942016 8e Linux LVM
Command (m for help): w The partition table has been altered!
Calling ioctl() to re-read partition table. Syncing disks.
[root@node1 ~]# ssh-keygen Generating public/private rsa key pair. Enter file in which to save the key (/root/.ssh/id_rsa): Created directory '/root/.ssh'. Enter passphrase (empty for no passphrase): Enter same passphrase again: Your identification has been saved in /root/.ssh/id_rsa. Your public key has been saved in /root/.ssh/id_rsa.pub. The key fingerprint is: SHA256:3F/MMmOKhOzcw1F5gkImyLlkMgBTulWKBkkyrZe5Rl8 root@node1 The key's randomart image is: +---[RSA 2048]----+ |@*.oo o | |*=Bo + . . | |oBo+ . . + . | |oo* .E+ o o o | |.o o .o S . = + | | o .o + o + = | | . o = . . | | . | | | +----[SHA256]-----+ [root@node1 ~]#
1 2 3 4 5 6 7 8 9
[root@node1 ~]# ssh-copy-id node1 /usr/bin/ssh-copy-id: INFO: Source of key(s) to be installed: "/root/.ssh/id_rsa.pub" The authenticity of host 'node1 (fe80::e71b:1e52:c6a8:3521%ens33)' can't be established. ECDSA key fingerprint is SHA256:cuzySJJ+Y1b0xwsabngEt/Onknu48EOGb+lxmFxLwsA. ECDSA key fingerprint is MD5:f9:b6:2c:32:94:58:10:70:88:89:9b:f4:8a:2b:18:fa. Are you sure you want to continue connecting (yes/no)? yes /usr/bin/ssh-copy-id: INFO: attempting to log in with the new key(s), to filter out any that are already installed /usr/bin/ssh-copy-id: INFO: 1 key(s) remain to be installed -- if you are prompted now it is to install the new keys root@node1's password: 输入密码
1 2 3 4 5 6 7 8 9
[root@node1 ~]# ssh-copy-id node2 /usr/bin/ssh-copy-id: INFO: Source of key(s) to be installed: "/root/.ssh/id_rsa.pub" The authenticity of host 'node2 (192.168.20.22)' can't be established. ECDSA key fingerprint is SHA256:cuzySJJ+Y1b0xwsabngEt/Onknu48EOGb+lxmFxLwsA. ECDSA key fingerprint is MD5:f9:b6:2c:32:94:58:10:70:88:89:9b:f4:8a:2b:18:fa. Are you sure you want to continue connecting (yes/no)? yes /usr/bin/ssh-copy-id: INFO: attempting to log in with the new key(s), to filter out any that are already installed /usr/bin/ssh-copy-id: INFO: 1 key(s) remain to be installed -- if you are prompted now it is to install the new keys root@node2's password: 输入密码
1 2 3 4 5 6 7 8 9
[root@node1 ~]# ssh-copy-id node3 /usr/bin/ssh-copy-id: INFO: Source of key(s) to be installed: "/root/.ssh/id_rsa.pub" The authenticity of host 'node3 (192.168.20.23)' can't be established. ECDSA key fingerprint is SHA256:cuzySJJ+Y1b0xwsabngEt/Onknu48EOGb+lxmFxLwsA. ECDSA key fingerprint is MD5:f9:b6:2c:32:94:58:10:70:88:89:9b:f4:8a:2b:18:fa. Are you sure you want to continue connecting (yes/no)? yes /usr/bin/ssh-copy-id: INFO: attempting to log in with the new key(s), to filter out any that are already installed /usr/bin/ssh-copy-id: INFO: 1 key(s) remain to be installed -- if you are prompted now it is to install the new keys root@node3's password: 输入密码
修改配置文件__所有工作节点执行
1
2
sed "25,26d" /usr/local/hadoop-2.10.1/etc/hadoop/hadoop-env.sh  -i
sed -i "24a export JAVA_HOME=/usr/local/jdk1.8.0_331" /usr/local/hadoop-2.10.1/etc/hadoop/hadoop-env.sh
1
sed -i "19a <property>\n\ <name>fs.defaultFS</name>\n\ <value>hdfs://node1:9000</value>\n</property>\n<property>\n\ <name>hadoop.tmp.dir</name>\n\ <value>/opt/hadoop-2.10.1</value>\n</property>" /usr/local/hadoop-2.10.1/etc/hadoop/core-site.xml
1
sed -i "19a <property>\n\ <name>dfs.replication</name>\n\ <value>1</value>\n</property>\n<property>\n\ <name>dfs.namenode.secondary.http-address</name>\n\ <value>node2:50090</value>\n</property>" /usr/local/hadoop-2.10.1/etc/hadoop/hdfs-site.xml
[root@node1 ~]# ssh-keygen
Generating public/private rsa key pair.
Enter file in which to save the key (/root/.ssh/id_rsa):
/root/.ssh/id_rsa already exists.
Overwrite (y/n)? y
Enter passphrase (empty for no passphrase):
Enter same passphrase again:
Your identification has been saved in /root/.ssh/id_rsa.
Your public key has been saved in /root/.ssh/id_rsa.pub.
The key fingerprint is:
SHA256:6JofyA259O812g65JO/R5gwDh6fV/GYyj5jL3mMn1wA root@node1
The key's randomart image is:
+---[RSA 2048]----+
|                 |
|                 |
|                 |
|     . o oE      |
|    + + S o.     |
|   o B * o ..    |
|    + B B B +o   |
|     o B ^+Oo .  |
|    o..+&+B=.    |
+----[SHA256]-----+
[root@node1 ~]# ssh-copy-id root@node1
/usr/bin/ssh-copy-id: INFO: Source of key(s) to be installed: "/root/.ssh/id_rsa.pub"
The authenticity of host 'node1 (192.168.20.31)' can't be established.
ECDSA key fingerprint is SHA256:QOg9grT/Owi/HDJRYqkboEZGGOABHPRDTpv99gGYL28.
ECDSA key fingerprint is MD5:d8:bf:8e:c5:89:5e:8c:94:36:f2:e2:20:c9:58:25:71.
Are you sure you want to continue connecting (yes/no)? yes
/usr/bin/ssh-copy-id: INFO: attempting to log in with the new key(s), to filter out any that are already installed
/usr/bin/ssh-copy-id: INFO: 1 key(s) remain to be installed -- if you are prompted now it is to install the new keys
root@node1's password:     这里输入密码

Number of key(s) added: 1

Now try logging into the machine, with:   "ssh 'root@node1'"
and check to make sure that only the key(s) you wanted were added.

[root@node1 ~]# ssh-copy-id root@node2
/usr/bin/ssh-copy-id: INFO: Source of key(s) to be installed: "/root/.ssh/id_rsa.pub"
The authenticity of host 'node2 (192.168.20.32)' can't be established.
ECDSA key fingerprint is SHA256:QOg9grT/Owi/HDJRYqkboEZGGOABHPRDTpv99gGYL28.
ECDSA key fingerprint is MD5:d8:bf:8e:c5:89:5e:8c:94:36:f2:e2:20:c9:58:25:71.
Are you sure you want to continue connecting (yes/no)? yes
/usr/bin/ssh-copy-id: INFO: attempting to log in with the new key(s), to filter out any that are already installed
/usr/bin/ssh-copy-id: INFO: 1 key(s) remain to be installed -- if you are prompted now it is to install the new keys
root@node2's password:    这里输入密码

Number of key(s) added: 1

Now try logging into the machine, with:   "ssh 'root@node2'"
and check to make sure that only the key(s) you wanted were added.

[root@node1 ~]# ssh-copy-id root@node3
/usr/bin/ssh-copy-id: INFO: Source of key(s) to be installed: "/root/.ssh/id_rsa.pub"
The authenticity of host 'node3 (192.168.20.33)' can't be established.
ECDSA key fingerprint is SHA256:QOg9grT/Owi/HDJRYqkboEZGGOABHPRDTpv99gGYL28.
ECDSA key fingerprint is MD5:d8:bf:8e:c5:89:5e:8c:94:36:f2:e2:20:c9:58:25:71.
Are you sure you want to continue connecting (yes/no)? yes
/usr/bin/ssh-copy-id: INFO: attempting to log in with the new key(s), to filter out any that are already installed
/usr/bin/ssh-copy-id: INFO: 1 key(s) remain to be installed -- if you are prompted now it is to install the new keys
root@node3's password:    这里输入密码

Number of key(s) added: 1

Now try logging into the machine, with:   "ssh 'root@node3'"
and check to make sure that only the key(s) you wanted were added.